Saturday, December 31, 2011

UBCD396XT - Setting Up NSW APCO 25.

Setting up the UBCD396XT to follow the current NSW GRN (Apco25) System is relatively easy - when you know how....

--------------------------------------------------------------------------------------------
HINT/TIP
Skip this step if your confident, but it is suggested that you remove all pre-set factory systems before commencing - although not necessary, it may make setting up this system easier for the novice!
A 'clean slate' will make it easier to set up and as the pre-loaded NSW data is outdated and it should be removed anyway.
I have covered this in another section called

UBCD396XT - First Time - Removing Unwanted Systems

-----------------------------------------------------------------------------------------


The first things we need to do is find the relevant frequencies we need to program the scanner for your area.

The best location to start is with the Radio Reference NSW GRN web page.
It can be found here. -  http://www.radioreference.com/apps/db/?sid=6943

If you scroll down the web page you will see a series of columns.

The three that are of interest to us are the Name, County and Frequencies.
Now as we don't have 'County's' here in Australia, simply remember a County as a 'Region'.

You will need to get a pen and a notepad.

What you need to do now is look for a 'Name' which is with 10kms from your home location.
These are the names of the locations of the GRN Towers.
Similar to a phone tower these are where the signals are received and transmitted. (in laymans terms).

You need to scroll down the 'Name' list until you find a Tower within say 10kms of your home location.
Lets say I am scrolling down the list and I see that 'Heathcote' is my closest Tower.
I would now look in the column directly to the right of 'Heathcote' and see that the region (County) is Sydney Outer. (SO).
Then look further to the columns to the right and you will see two frequencies coloured Red and Blue.
These are the Control Channels.
'Heathcotes' would be - 417.06250 and 417.56250.

What you need to to now is that you have found the relevant County/Regions that are of interest to you, put your computers mouse over the word 'County' at the top of the column and click it.
This will now arrange the listing in order of County/Regions.
(The Database is originally configured in order of 'Site' numbers.)

Now using the 'County/Region' column as a reference point - find all the relevant Names of the GRN Towers withn 10Kms of your location.
Then narrow them down to the one closest to your home location.
Obviously ones even closer than 10Kms would be best to use.
-------------------------------------------------------------------
Hint/Tip
In some cases you might find quite a few GRN towers in your County/Region. You don't have to enter them ALL! There is no point in putting in every single Control Channel if you dont live within range.
Putting in TOO many Control Channels can actually be a problem as it can in some cases, cause the scanner to lock onto a 'weaker' frequency and cause you headaches trying to follow a conversation.
There is a way to enter them ALL in a manner which will work - but for this exercise we will stick to the basics. If there are 4 or 5 GRN Towers - select only the closest one to your Home Base!
For example - If I lived close enough to be able to see a GRN tower from my house I would only enter that particular GRN towers Control Channels - nothing else!

I would also advise to use the standard antenna supplied with the scanner - do not use an external antenna when first setting up you scanner for any GRN.
The stock antenna will find the best control channel and strongest for your area! A larger antenna may cause the scanner to lock onto a weaker control channel and cause headaches!
Often the case is people follow all the rules then find they can't hear anything because the larger antenna has actually locked onto a distant or weaker control channel.....

-------------------------------------------------------------------
Once you have located the frequencies of relevance, you can now enter them in the scanner.
For this example I an going to enter the two Control Channels I found earlier for 'Heathcote' being the following -  417.06250 and 417.56250.

Turn the Scanner On

Push MENU

-MENU- will be displayed at the top of the screen, with Program System highlighted. As shown below.
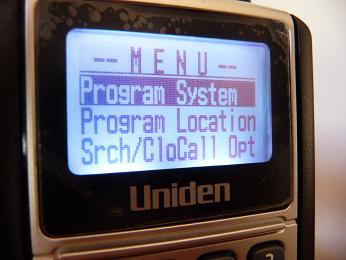


Push YES

Select System  will be displayed at the top of the screen
New System should be highlighted.
If New System is not highlighted - use the rotarty dial and turn it clockwise until New System is Highlighted.

Push Yes

Select System Type will be at the top of the screen.
P25 should be highlighted.
If P25 is not highlighted - use the rotarty dial and turn it clockwise unitl P25 is Highlighted.
As shown below.


Push Yes
P25 will be displayed at the top of the screen
Standard Trunk should be highlighted as shown below.


Push YES
The screen will now change and the following message will appear 'Confirm?' as shown below....


Confirm your selection by pushing YES


The Screen will then display System 1 at the top of the screen and Edit Name will be highlighted.
The same as the picture below.


It is recommended that you change the name of the System to one that can easily be recognised should you wish to edit it at a later date.
I would suggest changing it to NSW GRN.
While Edit Name is highlighted - push YES


Screen will now change and let you open the 'editing' menu to change the name of the system as shown below.


Screen will now look like the one above - at this point we want to enter new text and give the System a Name.


Lets call the new System - NSW GRN
To enter new Text - push the '.NO' button twice, this will clear the screen ready to enter new text.


To enter the 'text' - rotate the dial clockwise/anticlockwise and you will see letters/number/symbols appear under the cursor...  rotate the dial until capital 'N' appears.
Then push the 6 button to move the cursor to the right...
Rotate the dial clockwise again until capital 'S' appears..
Then push the '6' button again to move the cursor to the right.
To enter a blank space after 'NSW' simply push the '6' button once and the cursor will leave a space.
Follow this procedure until the word 'NSW GRN' is entered.
As shown below...


Once the word has been completed - Push YES
---------------------------------------------------------------------
Hint/Tip

If you make a mistake - you can push the '.NO' button once or simply push the '4' button to go back to the previous entry.
If you push the '.NO' button twice it will remove ALL the text and you will have to start again.
----------------------------------------------------------------------

After you have pushed the YES button the screen will quickly display 'Processing Please Wait' and then return to the previous screen and Edit Name will be highlighted again.

You should have NSW GRN written across the top of the screen as shown in the picture below.


At this point here you have created the beginnings of a 'System' that is now called 'NSW GRN'.

To enter the frequencies we need to do one more thing - that is create a 'Site'.

-------------------------------------------------------------------
Hint/Tip
A site contains the relevant frequencies for the County/Region.
The System is like a main folder - sites are similar to 'sub folders' inside the main folder..
The System may be know as 'NSW GRN', its 'sub folders' or 'sites' are created so you can put in different locations. - for this example I am calling the site 'Heathcote'.
In the 'Heathcote' site I will put in the two relevant frequencies (Control Channels) for the 'Heathcote' tower.
Now if I was doing a lot of travelling around the state I would create other 'Sites' and give them a name relevant to their area and put in their relevant frequencies.
That means when travelling around the State I could manually turn the 'Sites' on or off depending on where I was travelling.
Some poeple like to create ONE site for the entire State and put ALL the Control Channels in the scanner - similar to what Uniden does before it ships out the scanner...problem is that the scaner has to work harder to lock onto the relevant Control Channels and as I mentioned earlier will sometimes lock onto a tower simply because its in the vicinity - not always because its the 'strongest signal'.

Once you get used to how the system operates you can decide how you wish to set up your own sites.

-----------------------------------------------------------------------------
Setting up a 'Site'.

The screen should still be on this display as shown below.


Using the rotary dial - turn it clockwise until Edit Site is highlighted as shown below.


Once Edit Site has been highlighted - push YES

Select Site will be written at the top of the screen with New Site highlighted as shown in the picture below.

Push YES

The screen will then change let you edit the Site Name as shown below.


Push YES
The screen will then go to the Edit Name Menu where you can now give the Site a Name as shown below.


Lets call the new Site - 'Heatchcote' (As we will be using 'Heathcotes' Control Channels for this demonstration)
To remove the pre-set text - push the '.NO' button twice. This will clear the screen ready for you to enter the new Text.


Once the Text has been entered and completed - Push YES
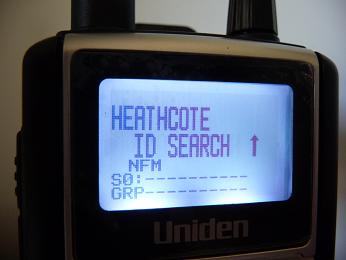
the screen will return to the previous Menu with 'HEATHCOTE' written across the top of the screen as shown below.


Using the rotary dial - turn clockwise until Set Frequencies is highlighted as shown below...


Once Set Frequencies is highlighted - Push YES


The screen will now display Sel Frequency at the top of the screen and New Frequency wil be highlighted as shown below in the picture below.


To enter a new frequency - Push YES

The screen will now change to let you input the frequency.
As shown below.

Using the keypad numbers - type in your frequency - in this case I will be using the two frequencies I have for my Heathcote System. 417.06250 and 417.56250.
Firstly I will type in 417.06250 as shown below.


Once you have 'keyed' in the required frequency - Push YES

The screen will then display the entered frequency and give you some options including 'Locking out'  and 'Deleting' the frequency.
As shown below.


At this point we have no reason to select either of these options so using the rotary dial - turn it clockwise until New Frequency is highlighted as shown below.

Once New Frequency is highlighted - Push YES

Repeat the process again and key in the second frequency 417.56250
as shown below.


Once you have 'keyed' in the second frequency - Push YES

The screen will then display the entered frequency again and give you the same options as before.
---------------------------------------------------------
Hint/Tip
If you had a third or more frequncies to enter you simply repeat the process again by scrolling down to New Frequency again and entering more Frequencies.
---------------------------------------------------------

In this case we are only entering two frequencies so after I have entered the second frequency and it retuns to the screen below I push MENU - Once.


The screen will then display the two entered frequencies under the Sel Frequency Screen.
As shown below.


If you  are happy with the results and the  frequencies you have entered are correct - Push the SCAN button.

The scanner will now start scanning as shown in the picture below.


-------------------------------------------------------------
Hint /Tip
For those clever enough to notice, in the picture above there should be a small bar graph to the top right hand side of the screen. (signal metre)
As this demonstration was created in South Australia, this bar graph/signal metre wont be visible as the frequencies entered have no relevance in SA (under this system type).
The is one more modification that has to be made before the scanner will track correctly.
Setting the P25 waiting time.

If you do not set this the scanner wont operate correctly and may miss entire conversations or replies.
--------------------------------------------------------------------
Setting the P25 Waiting time.

Push Menu

-MENU- will be displayed at the top of the screen.
Program System will be highlighted.
Using the Dial - turn it clockwise until Srch/CloCall Opt is highlighted.
As shown below.


Push YES

A new Menu will open up on the screen with the title Srch/CloCall Opt written at the top of the screen.
Freq Lockouts will be highlighted.
Using the dial - turn it clockwise until P25 Waiting Time is highlighted as shown below.


Push Yes
P25 Waiting time will be displayed at the top of the screen.
Using the dial - turn it clockwise unitl 400 ms is highlighted as shown below.


Push Yes
Screen will revert back to previous MENU.
At this point the scanner is ready to go.
If all the frequencies required (Control Channels ONLY) have been entered and the P25 Waiting time is set correctly - the scanner should work perfect.
At this stage - Push the SCAN button again and the scanner should start scanning for the NSW Apco25 System in your area. As shown below.


Please note!
The instructions I have given are as 'Basic' as possible without trying to cause too much confusion.
In doing so I have left out some extra options including how to create a 'Group' and how to store Talkgroup IDS in a group.
This will be covered later.
I am simlpy trying to get your new scanner up and running so it does not seem like an expensive paperweight.

If you don't hear anything straight away - don't give up.
Do a few basic checks.
Look at the small Bar graph on the top right hand side of the screen - does it have full signal.?
Double check your frequencies again.. are they entered correctly - one number out can cause problems!
Do you have Close Call activated - One would think not if your only a novice!
Double check your P25 waiting time.

If your still having trouble send me an e-mail and I will try and resolve the problem and put the 'cure' up on this Blog page.


Tuesday, December 27, 2011

UBCD396XT - Entering your Frequencies

Forget banks! It's all about the 'Systems'.

Some of you may be already familiar with the older type of scanners that had a series of 'Banks' containing 'Channels'...
Some of the early scanners would have 10 Banks of 10 Channels, giving you the option to save up to 100 frequencies... 10 x 10 = 100

Now as each bank could be turned on or off with the push of a button, you could say perhaps store your favourite 'Police' frequencies in the first Bank of 10 Channels, Fire Dept could be stored in the next bank and Ambulance in the next bank...
Now the problem was that although this sytem worked to a point if you only had 4 Police frequencies in Bank 1, you had another 6 that where empty in the same bank... kind of a waste of space really..

If you printed out the data it would have looked like this..

Bank One (Police)
Channel One - 413.0001
Channel Two - 413.0002
Channel Three - 413.0003
Channel Four - 413.0004
Channel Five - 000.000 (Empty)
Channel Six - 000.000 (Empty)
Channel Seven - 000.000 (Empty)
Channel Eight - 000.000 (Empty)
Channel Nine - 000.000 (Empty)
Channel Ten - 000.000 (Empty)
Bank Two (Fire Dept)
Channel Eleven - 79.0001
Channel Twelve - 79.0002
Etc Etc Etc...

Now as you can see from this little example above - there are wasted channels in Bank One..
Channels 5 through to 10 contain no frequencies hence the Bank has 6 empty or wasted channels, which could have contained more frequencies... 

With the new UBCD396XT this problem of 'wasted space' is overcome by using what Uniden Called 'Dynamic Memory'...
Put simply - it does not waste any space in the scanners memory bank.

Imagine that your scanner is a computer...

You have 10 Police frequencies that are used in your area and you wish to save them in the scanner.
Firstly you have to create a 'System' .
A system is similar to a 'New Folder' on your computer... The 'System' contains the relevant data for the scanner to monitor the information put inside the 'System'.

Lets say for example you create a 'Folder' in your computer and call it 'Police'.
Once you create the folder you can now save the required data in that folder to search later...
Now as you are aware, you can create 'Sub Folders' inside the Main Folder.
A 'Sub Folder' could be called 'North Area Police'.
Another could be called 'South Area Police'.
Each folder can contain the data or frequencies relevant to that area.
Even the 'Sub Folder' can contain even more folders inside it - with more data!!!

This principle is how the new UBCD396XT works.
The scanner does not waste any of its memory as it only uses the particular portion of the memory needed to store the data.. very similar to a Hard Drive on your computer..
You can change - enter or simply delete the data as required...

Just like a computer can search through files, the scanner will then 'Scan/Search' through all the information/data entered and stop on any active frequencies.


Lets enter a couple new frequencies and you will get the idea.


Here are a couple Frequencies I think are still being used by the NSW regional Police... this is an example only - please don't e-mail me complaining if they don't work - its only for demonstration!


Here are our frequencies...


78.0000
79.4125
164.9500
163.6375


We now want to enter them in our scanner...


Turn On the Sacnner.


Push the Menu button on the left hand side of the Scanner.


Program System will be highlighted.


Push - YES


Select Sytem will be displayed


Use the dial on top of the scanner, turn it clockwise unitl New System is highlighted


Push - YES


Select Sys Type will now be displayed on the top of the screen


Use the dial on top of the scanner, turn it clockwise unitl Conventional is highlighted


Push - YES


The screen will then display Confirm?
Yes="E" / No="."


Push - YES


The Screen will quickly display 'Processing Please Wait'
-----------------------------------------------------------------
Hint /Tip

The screen will then Display the System and its Number..
We want to edit the System and give it a name, making it not only easier to find later but this information will also be display on the scanners screen later...
-----------------------------------------------------------------
Edit Name will be highlighted


Push - YES


Edit Name will be displayed on top of the screen.
To put in a new name for the System - Push the .NO button twice, this will remove any preset information and clear the screen for you to enter a new name for the System.


Lets call the new System - Police


To enter this 'text' - rotate the dial clockwise and you will see letters/number/symbols appear under the cursor...  rotate the dial unitl capital 'P' appears.
Then push the 6 button to move the cursor to the right...
Rotate the dial clockwise again until lower case 'o' appears..
Then push the 6 button again to move the cursor to the right.
Follow this procedure unitl the word 'Police' is entered.
Once the word has been completed - Push YES
---------------------------------------------------------------------
Hint/Tip

If you make a mistake - you can push the '.NO' button once or simply push the '4' button to go back to the previous entry.
If you push the '.NO' button twice it will remove ALL the text and you will have to start again.
----------------------------------------------------------------------

After you have pushed the YES button the screen will quickly display 'Processing Please Wait' and then return to the previous screen and Edit Name will be highlighted again.

At this point here you have created the beginnings of a 'System' that is now called 'Police'.
---------------------------------------------------------------------
Hint/Tip
Now if done correctly you scanner should display the word Police at the top of the screen.
----------------------------------------------------------------------

Using the dial - turn it clockwise until Edit Sys Option is highlighted

Push - YES

Edit System Option will now be displayed at the top of the screen.

Using the dial - rotate it clockwise unitl Set Quick Key is highlighted.

Push - YES
--------------------------------------------------------------------
Hint/Tip
Setting a Quick Key allocates the System you have created a number that corresponds with one on the keypad of the scanner - making it easier to swith the system on or off at the push of a single button - similar to turning a bank on or off.
------------------------------------------------------------------------

Set Quick Key will now be displayed on top of the screen.
Using the dial -rotate it clockwise and select a number you wish to allocate your new sytem - for this example select 1.

Push - YES

Scanner will revert back to previous menu and Edit System Option will be displayed on screen again.

Using the dial -rotate it clockwise and select Set Hold Time

Push - YES

Set Hold Time will be displayed on top of the screen.

Enter the hold time of 2 seconds by pushing the '2' button.

Push - YES

------------------------------------------------------------------
Hint/Tip
Setting the hold time makes the scanner stay on the frequency for a maximum of 2 seconds after the last transmission. After the 2 seconds expires the scanner will then commence 'scanning' again.
If you don't set a Hold Time - the scanner may miss replies to conversations.
------------------------------------------------------------------

At this stage the screen will still show Set Hold Time - highlighted.
We have finished at this point and need to go back to the previous menu setting.

Push the Menu button ONCE!

Using the dial - rotate it clockwise until Edit Group is highlighted.

Push - YES

----------------------------------------------------------------------
Hint/Tip
A Group is a 'sub folder' inside the 'system' where the actual data required to make the scanner 'work' is entered - including the frequencies!
--------------------------------------------------------------------------

Select Group should be displayed on the top of the screen.
Using the dial - rotate it clockwise until New Group is Highlighted.

Push - YES

'Processing Please Wait' will appear for a few seconds then
Group 1 will be displayed at the top of the screen.
Edit Name will be highlighted.

For this example we are going to call our new group - Regional.
-----------------------------------------------------------------------
Hint/Tip
Remember we called the System 'Police' - 'Regional' will be a 'sub-folder' inside the system, similar to a sub folder inside a main folder on your computer.
You can put many 'New Groups' inside the main system..
You could call one 'Regional' the next 'Southern' the next 'Northern'... etc etc..
Each 'Group' contains the frequencies relevant to the dept or branch you wish to monitor...
For example - we could make a new System and call it 'Transport' - inside the system we could create 3 new groups and call them 'Taxis' - 'Couriers' - 'Freight'.
By entering the frequenices in their respective 'groups' it makes it easier to see who's talking when the scanner stops on an active frequency - this data will show on the screen - so the more information you provide the more data/text will appear on the screen, making it easier for the user to know exactly who is talking at any given time the scanner stops.

--------------------------------------------------------------------------

Edit name should already be highlighted - Push YES

We want to enter the following Text - 'Regional'

Using the same method as before when we entered 'Police', enter the word Regional and push YES.

Once the text has been entered and Yes has been pushed, the previous screen will now appear with the new name of 'Regional' at the top of the screen.

Using the dial rotate the dial clockwise and highlight Set Quick Key

Push Yes
-------------------------------------------------------------------------
Hint/Tip
At this stage we are going to allocate a group number to the group titled 'Regional'.
We do this so when the scanner is 'scanning' you can see that the group 'Regional' is active when the System called 'Police' is activated...
----------------------------------------------------------------------------
Set Quick Key will be displayed at the top of the screen.

Using the dial rotate it clockwise until 1 is highlighted. Push Yes

Screen will revert back to previous Menu.

'Regional' should be displayed at the top of the screen.

Now we have to enter the frequencies.

Using the dial rotate it clockwise util Edit Channel is highlighted.

Push Yes

Select Channel will be displayed at the top of the screen.

New Channel should be highlighted.

Push Yes

Input Frequency will be displayed at top of screen.

Using the keypad type in - 78.0000

(use the '.NO' button to enter the decimal point)
----------------------------------------------------------------
Hint/Tip
If you make a mistake entering the numbers, rotate the dial left or right putting the cursor over the incorrect number and re-type. If you wish to completely remove the data push the '.NO' button again.
-----------------------------------------------------------------

Once the frequency has been entered push YES.

'Processing Please Wait', will appear quickly and the scanner will show the frequency you have entered at the top of the screen.
This menu now lets you make adjustments to the entered frequency.
Including the modulation.
At this point we don't really need to change anything so push the Menu button ONCE!
This will now take you back to the Select Channel screen where you can enter the second frequency - 79.4125

Using the dial rotate it clockwise and highlight New Channel

Push YES

Repeat the previous steps as before and type in 79.4125

Once completed - Push YES.

Then push MENU - ONCE!

At this point it wil now display tthe two frequncies you have entered.

79.0000 and 79.4125

Using the same method as the last two - repeat the process and enter the last two frequencies:
164.9500
163.6375

Once you have repeated all the steps and get back to the Select Channel screen - push SCAN!
The scanner will now start scanning the frequencies you have entered inside the 'System' you have created.

If you look at the bottom of the screen you will see the following text on the left hand side.
SO:
GRP:

To the right of SO: the numeral '1' should appear.
To the right of GRP: the numeral '1' should also appear.
This means the scanner is 'scanning' - System ONE (Police) and Group ONE (Regional) is active and being monitored.

Thats how you enter your frequencies!
Yes its a long drawn out process, but after a few times it becomes easier and easier and before you know it - you can do it with your eyes shut!

All you need to do now is find whats active in your area!


Monday, December 26, 2011

UBCD396XT - Finding Frequencies in your Area

Having trouble finding whats going on in your area?


This is an easy way to find activity in your area - this information is available from the Australian Communication and Media Web page. http://www.acma.gov.au/WEB/HOMEPAGE/PC=HOME

The quick way to see whats available to listen to in your area - is by clicking on this link inside the Australian Communications and Media Web Page, you can do a search via your Postcode to see whats available.
Clik here - http://web.acma.gov.au/pls/radcom/assignment_range.range_search

When the page opens up - simply type in your postcode in the two boxes available...
For Example - Type in 3000 in the Low Postcode Box and then type in 3000 in the High Postcode Box.
Then type in 30 in the Low Frequency Box (Select Mhz) and then type in 500 in the High Frequency Box (Select Mhz).
Once all filled - simply click the 'RUN ENQUIRY' box.

It will take anywhere between a few seconds to a few minutes to load up all the licenced frequencies for your area.. if you wish to widen the search area, simply type in a higher Postcode number in the second box.
If you wish to narrow or widen the frequency search - simply type in the two alternate lower and higher numbers that are of interest to you...

Once the page opens - click on the 'Frequency' tab on the second column to sort the frequencies into numerical order...

Now you can either print the pages or cut and paste them into a speadsheet file....


SD Card - Handy tips and tricks to help navigate the installed data.

Handy tips and trick when using your updated Ozscan SD card. Please click on the link below to go directly to an online instruction manual. ...